Background
I recently needed to stand up an ASP.NET Core web API that uses the ONNX Runtime to perform machine learning classifications. Due to some odd Windows Subsystem for Linux (WSL) networking issues when running behind a corporate proxy (perhaps a topic for a future blog post), it made sense to host it directly inside WSL.
To enable GPU support in WSL, various CUDA-related libraries needed to be installed and configured, just as with Windows or Linux. Although the process ultimately proved to be quick and simple, I struggled for a while to figure it out. The usual web searching and GPT consulting were of limited help, and one forum commenter understandably speculated that it isn’t even possible.
If you find yourself in the same situation, rest assured that it is possible, and not too difficult.
Prerequisites
These instructions assume that you are generally familiar with machine learning and CUDA, and have some prior experience configuring a GPU workstation.
Instructions
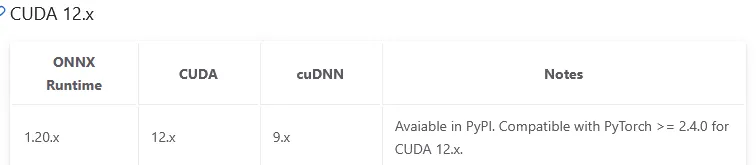
1. Determine which CUDA and cuDNN Library Versions to Use
The web API uses the ONNX Runtime GPU package version 1.21.x, which, according to the slightly outdated requirements, depends on CUDA version 12.x and cuDNN version 9.x:
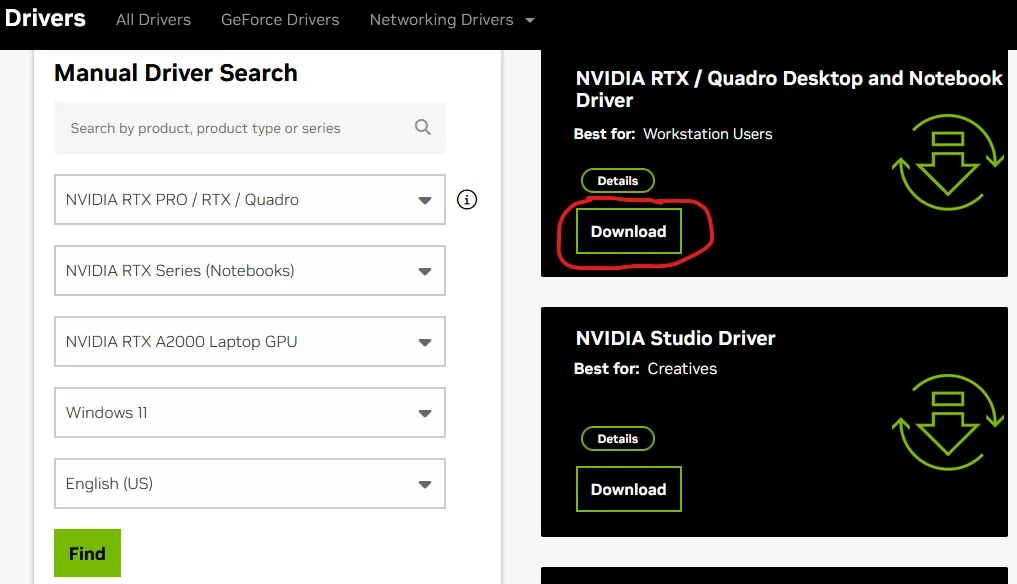
2. Install the NVIDIA Windows Driver
Per the CUDA on WSL User Guide, download and install the Windows driver for your GPU from the drivers page. Even if you already have the driver, you may want to consider updating it, as driver versions R495 and later support CUDA in WSL.
For example, here’s what it looks like when installing the driver for an A2000 laptop GPU:
3. Install CUDA on WSL2
The user guide’s instructions worked correctly for me. They are reproduced here for convenience.
First, remove the old GPG key:
sudo apt-key del 7fa2af80Next, follow the download and installation instructions on the CUDA download page, for the following configuration:
- Operating System: Linux
- Architecture: x86_64
- Distribution: WSL-Ubuntu
- Version: (latest)
- Installer Type: “deb (network)”, assuming your workstation has network access
The resulting instructions look something like this, though the version numbers in the URLs may be different for you:
wget https://developer.download.nvidia.com/compute/cuda/repos/wsl-ubuntu/x86_64/cuda-wsl-ubuntu.pin
sudo mv cuda-wsl-ubuntu.pin /etc/apt/preferences.d/cuda-repository-pin-600
wget https://developer.download.nvidia.com/compute/cuda/12.9.1/local_installers/cuda-repo-wsl-ubuntu-12-9-local_12.9.1-1_amd64.deb
sudo dpkg -i cuda-repo-wsl-ubuntu-12-9-local_12.9.1-1_amd64.deb
sudo cp /var/cuda-repo-wsl-ubuntu-12-9-local/cuda-*-keyring.gpg /usr/share/keyrings/
sudo apt-get update
sudo apt-get -y install cuda-toolkit-12-9
4. Install cuDNN in WSL
From the cuDNN download page, it’s reasonable to specify the same configuration as used above for CUDA to get the download instructions. Unfortunately, this won’t work for WSL. The final step:
sudo apt-get -y install cudnnresulted in a “package not found” error for me, and running apt list | grep cudnn didn’t uncover any similarly named packages.
What ultimately worked was to use the “Tarball” distribution, and here the instructions are lacking because they are largely OS-dependent.
First, download the tarball, per the instructions. Again, your URL and version numbers may vary:
wget https://developer.download.nvidia.com/compute/cudnn/redist/cudnn/linux-x86_64/cudnn-linux-x86_64-9.11.0.98_cuda12-archive.tar.xzNext, untar and decompress the archive (the “J” option is needed for XZ compression):
tar -xJvf ./cudnn-linux-x86_64-9.11.0.98_cuda12-archive.tar.xzCopy the *.h and lib* files to the respective usr/local/cuda/ subdirectories and set read access to them, and then set the environment variables to include them. If the extracted directory name is different, adjust the cd command accordingly. (Hat tip to Pradeep Loganathan):
cd ./cudnn-linux-x86_64-9.11.0.98_cuda12-archive/
sudo cp ./include/cudnn*.h /usr/local/cuda/include
sudo cp ./lib/libcudnn* /usr/local/cuda/lib64
sudo chmod a+r /usr/local/cuda/include/cudnn*.h /usr/local/cuda/lib64/libcudnn*

echo 'export PATH=/usr/local/cuda/bin:$PATH' >> ~/.bashrc
echo 'export LD_LIBRARY_PATH=/usr/local/cuda/lib64:$LD_LIBRARY_PATH' >> ~/.bashrc
source ~/.bashrc
5. Test the Installation
This will largely depend on which language you’re using the ONNX Runtime GPU in. For my ASP.NET web API, the slightly simplified initialization code looks like this:
using Microsoft.ML.OnnxRuntime;

var availableProviders = OrtEnv.Instance().GetAvailableProviders();
var sessionOptions = new Microsoft.ML.OnnxRuntime.SessionOptions();
if (false == availableProviders.Contains("CUDAExecutionProvider"))
{
    _logger.LogInformation("GPU is either not available, or CUDA is not installed. Defaulting to CPU.");
}
else
{
    try
    {
        sessionOptions.AppendExecutionProvider_CUDA();
        inferenceSession = new InferenceSession(modelStream.ToArray(), sessionOptions);
        _logger.LogInformation("Loaded model {ModelFilename} onto the GPU.", modelFilename);
        device = "GPU";
    }
    catch (Exception ex)
    {
        _logger.LogDebug("GPU error details: {ErrorMessage}", ex.Message);
    }
}
Running the web API with Debug-level logging, i.e.:
Logging__LogLevel__Default=Debug dotnet run /path/to/projectwill display helpful information if the GPU can’t be initialized, such as which .so library could not be found.
This will help narrow the problem to a CUDA, cuDNN, or other misconfiguration.